With the preliminaries done, now come the fun part. Here's what you need to do to start making gas.
Try starting up without the hopper first, this will be easier to manage preliminary runs.
Table of Contents:
1. Seals
2. Insulation
3. Filter media
4. Instrumentation
a) Manomenter
b) Thermocouples
5. Charcoal
6. Biomass
7. Cold Test/Double check
1. Seals
Durning assembly every single flange and connection should be sealed, there should be no metal flanges touching each other without sealing. The ejector venturi pulls a vacuum on the system which pulls air through the air nozzles inside the reactor. If seals are leaking, the reaction will be compramised leading to failed runs and leaking of wood gas (namely carbon monoxide) will occur out of unsuspected places in the system during shut down. Make sure there is no leaking around the grate post, instrumentation ports, or the mechanical fuel sensor.


The kit comes with four types of sealing materials.
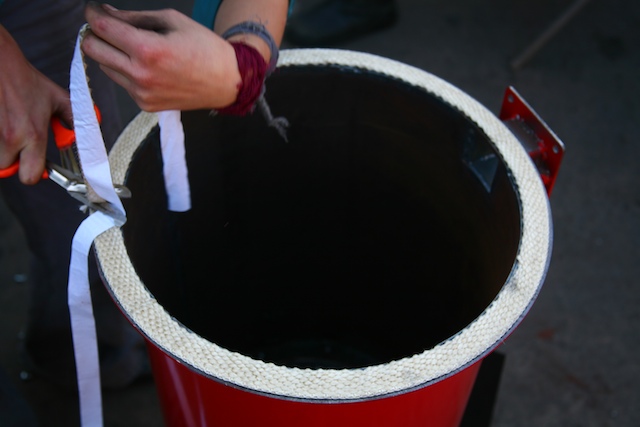
- White ceramic clay weather stripping: place the clay weather stripping on the bottom of the gas cowling, ash port lid, at the base of the air nozzles, inside the lid of the mason jar, and on both sides of the cyclone tube plate or filter adapter. The clay is not reusable, be sure to scrape off the old clay and reapply when disturbed.
- Fiberglass tape: the fiberglass tape is used for its reusability on flanges that become hot during a run. Place the fiberglass tape on the top flange of the gas cowling, the gas cowling cyclone flange, the port on the reactor lid, and the drying bucket flange to the doghouse or pyrocoil.
- Brown reusable weather stripping: use the brown weather stripping on the top of the filter housing for the lid, the top flange on the drying bucket, the lid for the hopper and the port on the reactor lid.
- High heat mortar: Use the high heat mortar on the bottom of the reduction bell.
Return to top
2. Insulation
Fill the annular ring in the downdraft reactor with insulating material. This can be charcoal dust, ash, perlite, pumice or kaowool.
(Optional: You can also fill the inert area down in the bottom around the outside of the reduction bell and the tar fence if you like. The material in this area does not move, and is only there to increase the insulation around the reduction bell. Thus you can use ash, perlite or pumice in here also, but likely not kaowool. Just stop about an inch below the reduction bell lip. You do not want the insulation material getting into the reduction bell. Upwards from here should here should only be charcoal.) We have been using Perlite, but there may be other materials appropriate to your area that will suffice as an insulating layer. The material should be able to handle a high heat environment.


Return to top
3. Filter Media
Make sure the filter housing is filled with a charcoal filter media. You want to use small pieces from an 1/8" to 1/2". Fill the filter about two inches from the top. We use about 2 inches of steal wool at the top. Be sure to place the filter perf plate on top of the media to hold it in place.


Return to top
4. Instrumentation
a) Manometer
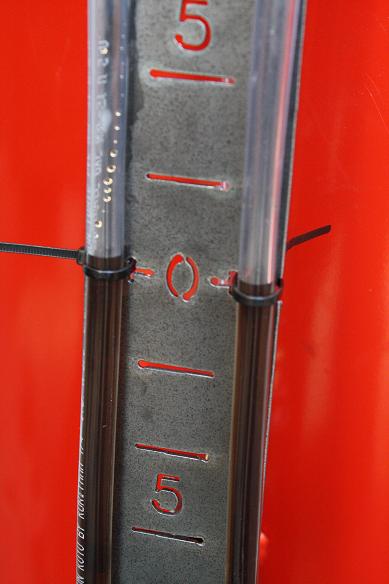
- Fill up the manometer with water up to the zero mark. We add a couple of drops of coffee to so that it is more visible.
- Be sure to get all of the bubbles out. This is easier to disconnect the ends of the manometer from the reactor and filter port temporarily so that the bubbles can escape.


b) Thermocouples and Placement
There are several places that we have added ports so that thermocouples can be placed in significant places through out the system. We have found that the top and bottom of reduction temperatures to be of significant importance and will tell a lot about how the reactor is running:
I) Bottom of reduction temperature: The cap on the close nipple of the manometer can be ameded to be a port for a thermocouple. A thermocouple at this location will clear the bottom of the reaction chamber inside the gas cowling. Be careful when placing a thermocouple at this location: If the thermocoule seems to jam, move it around a little so that it will slide in between the gas lines. Place the thermocouple one inch inside the edge of the reduction bell, any further can block the flow of charcoal in this region.
II) Top of reduction temperature: The new stainless steal 11'' hourglass reduction bell has a thermocouple port in the top of reduction temperature can slide into the instrument. Thread the thermocouple through the smooth threadless port down through the top of the reactor. Be sure to secure and protect the thermocouple so that it is not in the way of the flow of biomass through the reactor.Be sure to seal up the port so that no air is able to enter.
-

Return to top
5. Fill up with Charcoal
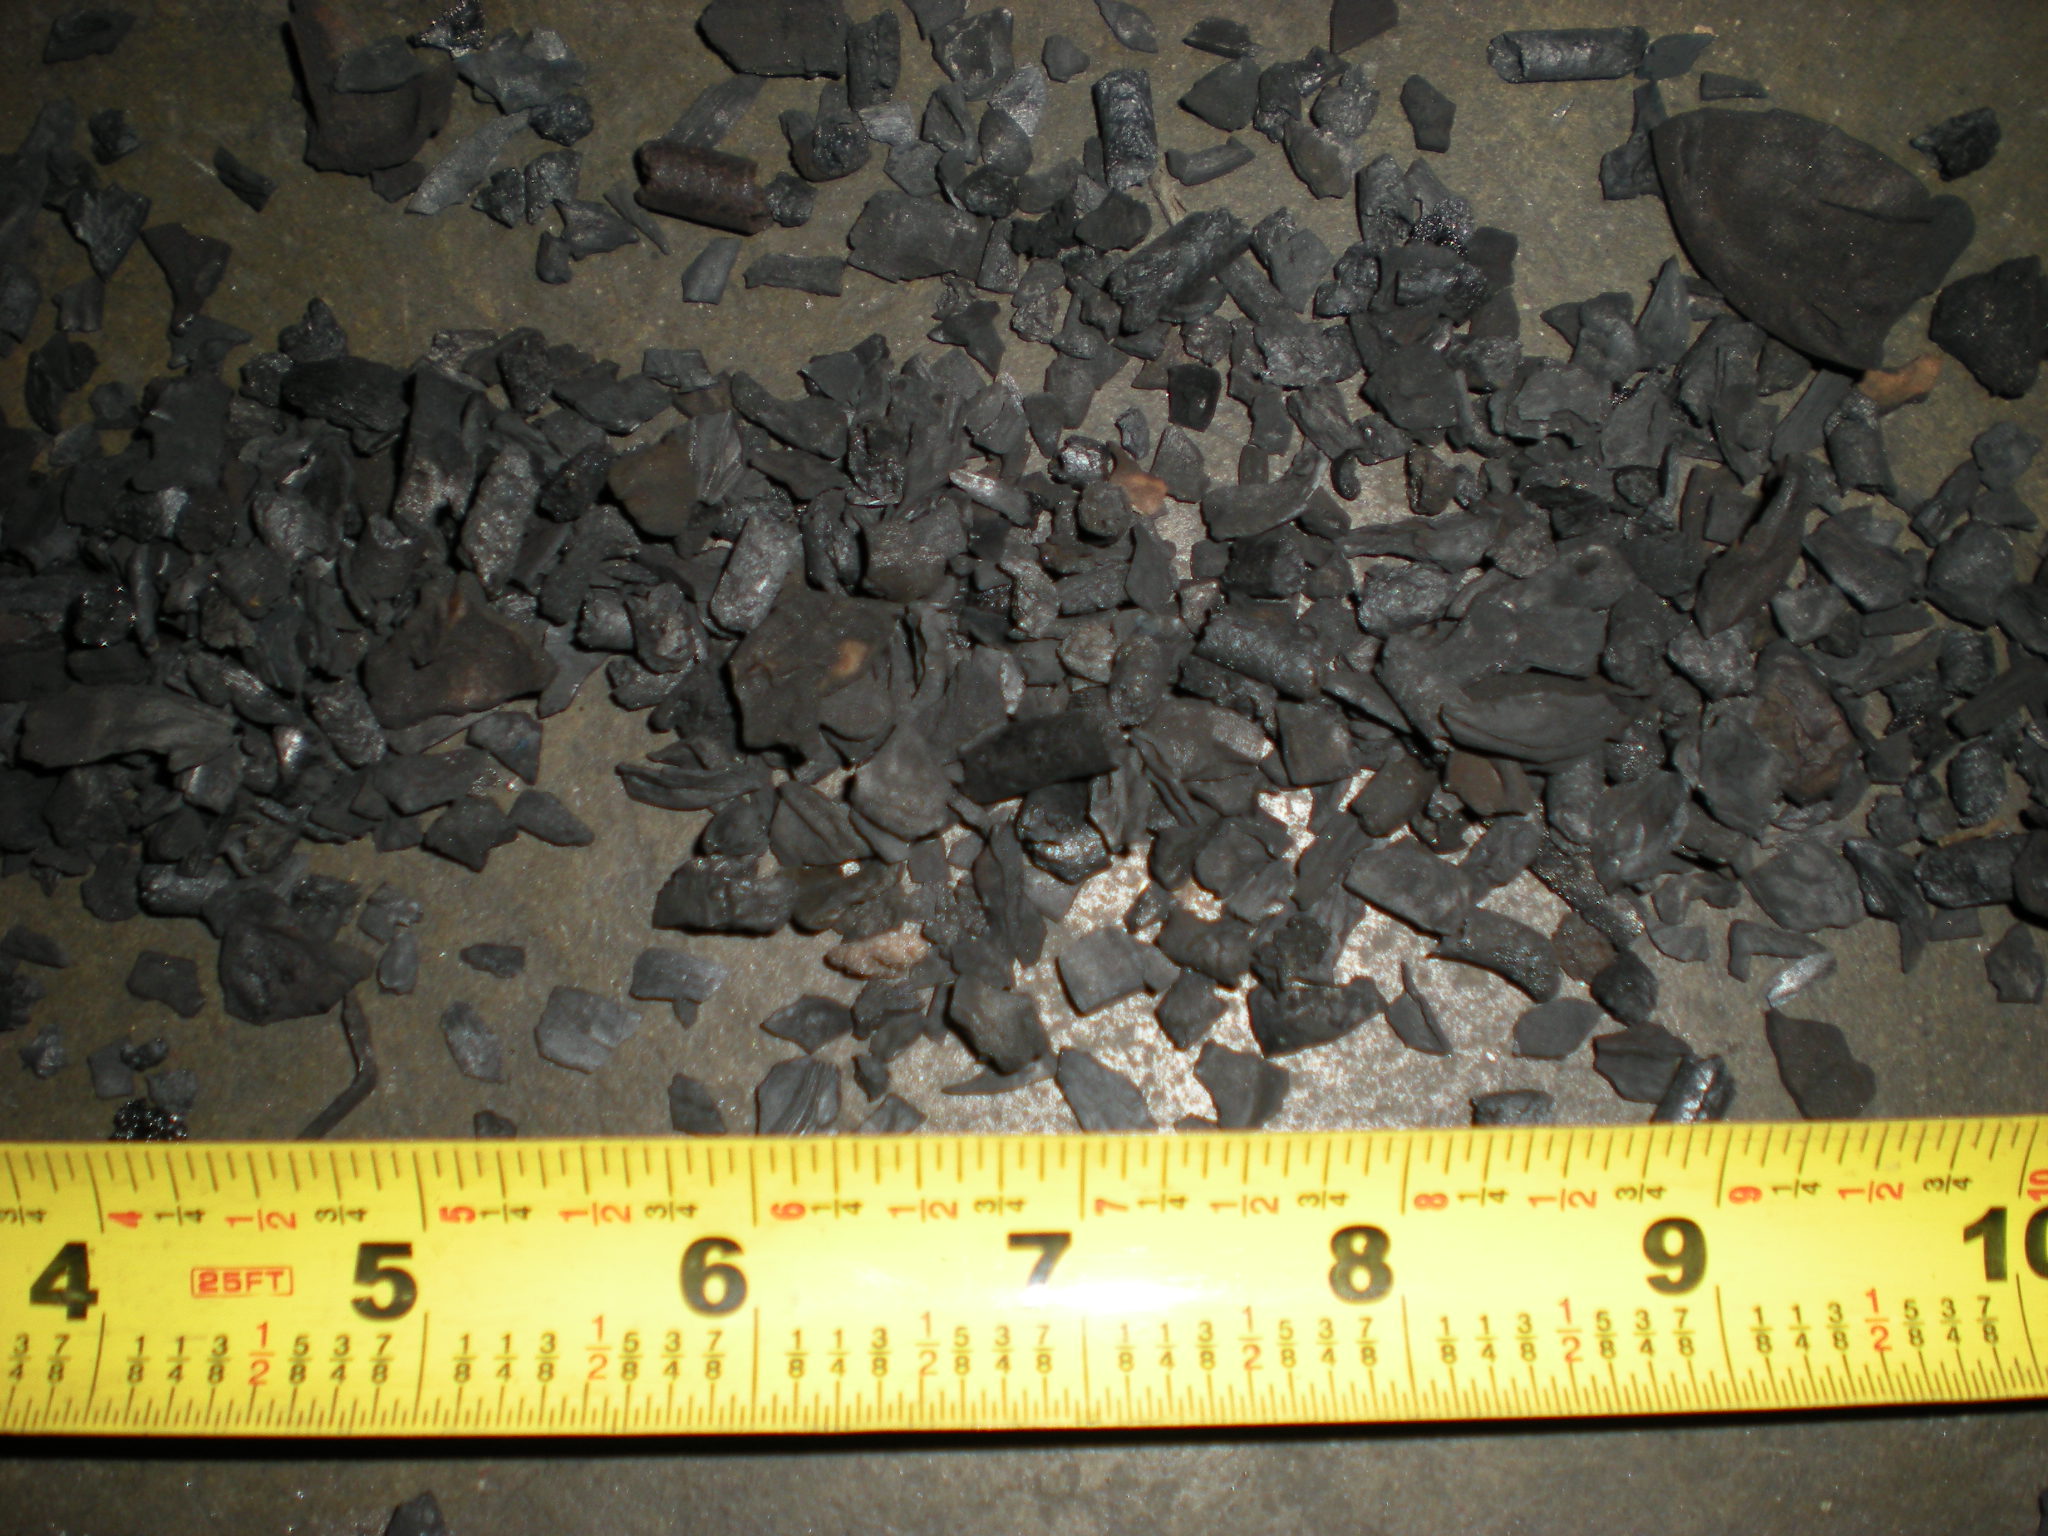
Fill the bottom of the reactor, as well as inside the reduction bell, and on top of the ash grate with charcoal. Fill the reduction bell, then spin your ash grate, this will pull the charcoal into the space under your reactor, reapeat until it wont fill any more. Use chunks of about .5" - 1" cross section. No dust, as that will foul the reduction on start. Fill all the way up to about 1" or 2" above the ignition port, or air nozzles. Make sure the charcoal fully filling all the lower spaces and nooks and crannies. Turn the ash grate vigorously to settle things. Shake the GEK a bit. Be rough.
USE REAL WOOD CHARCOAL! It is important that you start with real wood charcoal, not Kingsford or the like, which is mostly pressed coal dust. Get some charcoal from your fireplace or firepit, or mesquite BBQ charcoal. Make sure the charcoal is fully pyrolysed. To the degree that you use imcompletely pyrolysed charcoal, you will get tar on start up. To the degree you use wet charcoal, you will have steam on start up. Charcoal is very hydroscopic so it is likely your charcoal will be wetter than you imagine. Such is OK as it will vaporize off quickly. You will see this as white smoke at the beginning of the start.


Return to top
6. Add Raw Biomass
Layer the raw biomass on top of the charcoal. Not more charcoal. You need biomass to have pyrolysis so that there is tar to burn in the combustion zone. Fill the biomass to the top of the reactor or hopper. Afix the lid and make sure it is tight. Turn the ash grate and shake the unit to make sure all the fuel is settled in. Be vigorous. You can't hurt it. (A long pipe is useful as a lever for the ash grate handle when the reactor is hot or the grate becomes difficult to move).
You may need to sift out larger chunks of biomass using a screen so that bridging does not occur over the reduction bell; too many small particles or sawdust will tend to pack the reactor limiting flow rate.


More on the GEK Forum: http://gekgasifier.com/forums/index.php/topic/95-sifting-bridges-out-of-wood-chips/
Return to top
3. Cold Test/ Double Check
Before lighting, always double check everything! It is much easier to trouble shoot the preliminaries before the thing is on fire. Open the air inlet cap on the reactor, open the valve to the swirl burner, and close the air pre-mix valve. Turn on the air compressor (or fan), does the manometer quickly respond (you should be able to pull 5 inches of water easily before its lit)? If not, do not try to light the reactor, instead double check:
-Air inlet cap: Is the air inlet cap still on?
-Check the manometer: If the manometer is still not responding, check to see if the manometer is hooked up correctly.
-All seals in place: Any leaking downstream in the system will bypass the suction needed for the air nozzles. Sealing is very important: check: bottom plate of the reactor, bottom of the reduction bell, top of the gas cowling, reactor lid, cyclone flange, mason jar connection, cyclone tube plate, filter housing, filter housing lid, ash port, lid port, hopper, drying bucket, etc.
-All bungs/openings are plugged/capped: There are several places where there are holes that need to be plugged: large bung on the side of the gas cowling, thermocouple port on the top of the reactor, any ports on the lid, the gas out sampling port on the gas cowling right before the cyclone, the three ports on the filter housing (one is populated with the manometer), the port at the bottom of the reactor (where the manometer face plate is located).
-Open all gas valves: There are two valves on the top of the ejector venturi assembly. There is one that is a port for the gas take off, this should be closed at start up. The other routes to the swirl burner, this one should be open. The purpose of the flare is to start up the reactor and flare off the tarry gasses during the time it takes the reactor to get up to the temperatures it takes to crack the tars. It is possible after a run that wood tars will condense on the gate valve making it harder to open, with the same amount of torque you gave it previously it feels open when it could be closed. Double check this when it is relevent.
-All seals in place: Any leaking downstream in the system will bypass the suction needed for the air nozzles. Sealing is very important: check: bottom plate of the reactor, bottom of the reduction bell, top of the gas cowling, reactor lid, cyclone flange, mason jar connection, cyclone tube plate, filter housing, filter housing lid, ash port, top port.
-All bungs are plugged/capped: There are several places where there are holes that need to be plugged: large bung on the side of the gas cowling, thermocouple port on the top of the reactor, any ports on the lid, the gas out sampling port on the gas cowling right before the cyclone, the three ports on the filter housing (one is populated with the manometer), the port at the bottom of the reactor (where the manometer face plate is located).
-Open/close proper gas valves: There are two valves on the top of the ejector venturi assembly. There is one that is a port for the gas take off, this should be closed at start up. The other routes to the swirl burner, this one should be open. The purpose of the flare is to start up the reactor and flare off the tarry gasses during the time it takes the reactor to get up to the temperatures it takes to crack the tars. It is possible after a run that wood tars will condense on the gate valve making it harder to open, with the same amount of torque you gave it previously it feels open when it could be closed. Double check this when it is relevent.
Manometer responding? Yes? Congradulations, you have graduated to the Start-up Instructions!
Return to top
Need help?
contact: jay(at)allpowerlabs.org


Comments (0)
You don't have permission to comment on this page.